Configuration Guidance of Wavlink Dual-Band Extender
The dual-band WiFi range extender is another name for the Wavlink AC1200 WiFi range extender. With the aid of this gadget, you may easily increase the WiFi signal’s current range. Read this entire page to learn everything there is to know regarding the Wavlink AC1200 repeater device.
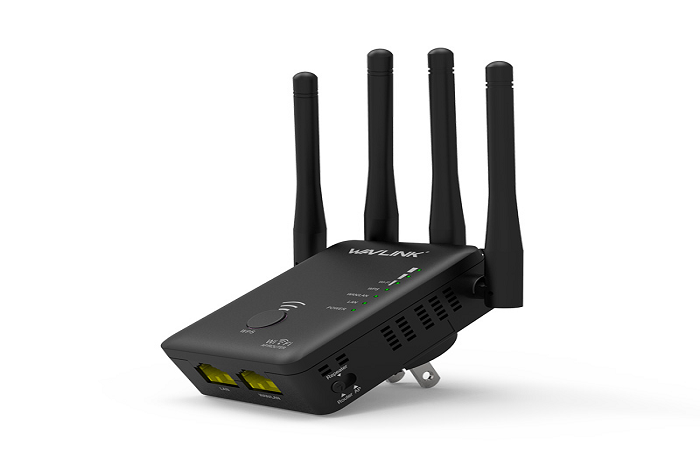
Complete Details Of The Wavlink AC1200
WPS Button: You may quickly pair the existing router with an extender using the guidance of the WiFi-protected setup button.
Reset Button: Any type of typical problem can be quickly fixed by pressing the reset button.
LED Status Of AC1200 WiFi Gadget
- A solid pink LED that begins blinking signals the start of the device.
- The internet is connected but inaccessible if the RED LED begins to slowly flash.
- When the steady red LED begins to blink, the internet connection is unreliable.
- A stable blue LED will begin blinking when the connection is sound.
- If the blue LED is blinking rapidly, WPS is attempting to connect to the host router.
Visit The Login Site Of The Wavlink Device
- Put the Wavlink AC1200 extender power connector first in a functioning power outlet.
- Connect the laptop or PC to the Wavlink repeater network at this point.
- Then, launch a browser and type wavlink.com into the address box.
- Then, complete all of the login information listed on the web management page.
- Check the handbook if you don’t know the Wavlink extender login credentials.
The Wavlink repeater authentication procedure is now finished after complying with the instructions above.
Configure AC1200 Gadget Through WPS Button
Here are some steps for setting up your Wavlink AC1200 extender by pressing the WiFi-protected setup button. Your primary router’s WPS button is a need for using the WPS method.
- The Wavlink AC1200 repeater power plug should first be inserted into the power outlet.
- At this point, push the AC1200 extender’s WPS button.
- After that, push the WPS button on the current router within a period of ten to twenty seconds.
- The stable WPS LED then begins blinking after that.
- As so, the extender and router were successfully connected by pressing the WPS button.
Configure AC1200 Via Web Interface
- Initially, launch your laptop’s or computer’s navigation.
- After that, type the IP address or default web portal into the address bar.
- Next, enter all the information requested on the screen, including your login and security password.
- You will also go directly to the Wavlink AC1200 repeater configuration page.
- Finally, attentively observe or take into account any display directions.
Setup Your Wavlink Extender Through AP Mode
- Start by connecting the ethernet cable’s one end to the ethernet port on the extender.
- Next, attach the other end of the Ethernet cable to the router’s active Ethernet port.
- Additionally, launch your computer’s navigator and type 192.168.10.1 into the URL box.
- Tap next after selecting the access point mode.
- Now, create an SSID and security password for the new AP mode.
- Read all of the screen directions before completing the Wavlink AC1200 setup.
Fix Any Issues With Extenders
- Check the status of the Wavlink AC1200 repeater device’s LED.
- Try restarting both the extender that you are using and the router.
- That additional Wi-Fi-enabled device that connects to your extender network should be removed or turned off.
- Determine how far the Wavlink AC1200 repeater is from the router.
- View each and every cable connection.
After attempting a number of fixes, the extender problem may still persist. Then, take into account the advanced option advice below.
Place Far From Metal Or Electronics
You may experience connection problems if you place your repeater and router equipment close to metal or electronic gadgets. All of the WiFi signals from the extender and router equipment are absorbed by metallic or electronic devices. If you wish to fix the connection problem, we advise moving the extender and router devices to a new position.
Update Wavlink Extender’s Firmware
- You must go to the Wavlink extender web management website in order to enhance the extender program.
- Find a management option next, then press on a firmware update.
- Install the most recent software update on your computer or laptop now.
- Reboot your gadget to complete the firmware upgrade procedure.
Do Wavlink Extender Reset
- The main point Wavlink AC1200 repeater device has a reset button on the back.
- Now, using a pin, press that button for approximately eight to ten seconds.
- This Wavlink AC1200 extender’s LEDs will all turn off once you finish.
- Your extender has now completely reset, so that’s what it signifies.
- Repeat the sign-in and setup procedures after the Wavlink AC1200 extender has been reset.
Tip: If you have a Wavlink extender with a different model number, like the AC600, and you’re trying to find login and setup instructions but can’t find the proper answers. Thus, all that requires of you is that you go to the Wavlink AC600 setup website and follow the instructions.
As of right now, after reading through this entire article, you will be able to log in to and set up a Wavlink AC600 extender on your own without seeking assistance from a technician specialist. But if you need professional advice, get in touch with us right away. For Readers!


